Finding homemade Gluten Free Dinner Rolls that are soft, fluffy, and full of flavor can sometimes feel challenging. Many gluten-free bread recipes produce rolls that are dense, dry, or crumbly, but this recipe delivers bakery-style results with a wonderfully light texture and rich buttery taste.
These dinner rolls are perfect for holiday meals, family dinners, sandwiches, or simply enjoying warm with a little butter. Their golden crust and tender interior make them an excellent substitute for traditional wheat-based rolls, allowing everyone at the table to enjoy freshly baked bread regardless of dietary needs.
Why These Gluten Free Dinner Rolls Stand Out
Not all gluten-free bread recipes are created equal. These dinner rolls are specially designed to achieve a soft, airy texture that closely resembles classic homemade yeast rolls. A carefully balanced combination of gluten-free flour blend, tapioca starch, xanthan gum, yeast, butter, milk, and egg whites creates dough that rises beautifully and bakes into light, fluffy rolls. Every bite offers a delicate crumb, rich buttery flavor, and just the right amount of chew, making them one of the most satisfying gluten-free bread recipes you can prepare at home.
Perfect for Holidays and Everyday Meals
Fresh dinner rolls are often the centerpiece of family meals, especially during holiday celebrations. These Gluten Free Dinner Rolls fit perfectly alongside roast dinners, soups, salads, pasta dishes, and festive holiday feasts. Their soft texture also makes them ideal for making mini sandwiches or serving with breakfast spreads. Because they pair well with both savory and sweet foods, they quickly become a versatile addition to any meal throughout the year. Whether you’re preparing Thanksgiving dinner, Christmas lunch, or a simple weeknight meal, these homemade rolls always impress.
Why Homemade Gluten Free Bread Is Worth Making
Store-bought gluten-free bread often contains preservatives, artificial ingredients, and inconsistent textures. Preparing your own dinner rolls at home allows complete control over every ingredient while producing noticeably fresher results. Homemade rolls also fill your kitchen with the comforting aroma of freshly baked bread, creating an experience that packaged products simply cannot match. Although the recipe requires some rising time, the actual preparation is straightforward, making it well worth the effort for anyone who enjoys baking fresh bread from scratch.
The Secret to Soft and Fluffy Rolls
The remarkable texture of these dinner rolls comes from the careful balance of ingredients working together. The gluten-free flour blend provides the primary structure, while tapioca starch contributes elasticity and softness that gluten-free breads often lack. Xanthan gum helps hold everything together by replacing some of the structure normally provided by gluten. Butter enriches the dough with moisture and flavor, while warm milk creates tenderness throughout the finished rolls. Together, these ingredients produce bread that is soft enough to pull apart easily while remaining sturdy enough for serving with any meal.
Choosing the Right Gluten Free Flour Blend
Selecting a quality all-purpose gluten-free flour blend is one of the most important decisions when making these dinner rolls. Different flour blends contain different combinations of rice flour, potato starch, tapioca starch, and other gluten-free ingredients, so using a reliable blend helps produce consistent results. If your flour blend already contains xanthan gum, there is no need to add extra. Following the recipe exactly with the appropriate flour blend ensures the dough develops the correct consistency while baking into beautifully soft and fluffy rolls.
Tapioca Starch Improves Texture and Elasticity
Tapioca starch is an essential ingredient in many successful gluten-free baking recipes because it helps create a soft, stretchy dough that closely resembles traditional wheat-based bread. Without it, gluten-free rolls can become dry or crumbly after baking. In this recipe, the tapioca starch works alongside the gluten-free flour blend to create a lighter crumb and a more tender bite. It also contributes to the beautiful golden crust while helping the rolls remain soft even after they have cooled.
Xanthan Gum Helps Replace Gluten
Since gluten-free flour naturally lacks the gluten found in wheat flour, xanthan gum plays an important role in holding the dough together. It creates elasticity, improves structure, and helps the dough trap air during rising. This allows the dinner rolls to develop a light, fluffy texture instead of becoming dense or fragile. If your chosen gluten-free flour blend already contains xanthan gum, there is no need to add additional amounts, as too much can affect the texture of the finished rolls.
Instant Yeast Produces Reliable Results
Instant yeast helps these dinner rolls rise efficiently while simplifying the baking process. Unlike some other yeast varieties, instant yeast can be mixed directly with the dry ingredients without prior activation. As the dough rests, the yeast gradually produces gas that expands the dough, creating the airy texture everyone expects from freshly baked rolls. Using fresh, properly stored yeast is essential for achieving consistent results and ensuring the rolls develop a beautiful rise during proofing and baking.
Warm Milk Creates a Tender Dough
Warm milk adds moisture, richness, and tenderness to the dough while providing an ideal environment for the yeast to work effectively. The recommended temperature of approximately 90°F helps activate the yeast without damaging it. Milk also contributes to the soft crumb and delicate flavor that make these dinner rolls so enjoyable. Combined with melted butter, it creates a rich dough that bakes into rolls with a wonderfully smooth texture and a beautifully golden crust.
Butter Adds Rich Flavor and Softness
Butter is one of the ingredients responsible for the rich taste and tender texture of these Gluten Free Dinner Rolls. Melted butter blends evenly throughout the dough, adding moisture while helping keep the rolls soft after baking. Brushing additional melted butter over the rolls immediately after they come out of the oven enhances both their appearance and flavor. The warm butter is absorbed into the crust, creating a glossy finish and making every bite even more delicious.
Egg Whites Improve Structure
The egg whites strengthen the dough while helping create a lighter texture inside each dinner roll. During baking, they contribute to the overall structure, allowing the rolls to rise evenly and maintain their shape. Because only the whites are used, the dough remains light without becoming overly rich. Combined with the gluten-free flour blend and xanthan gum, the egg whites help produce rolls that are tender, fluffy, and easy to pull apart.
Mixing the Dough Properly
Proper mixing is one of the most important steps in achieving excellent gluten-free bread. Using a stand mixer fitted with a paddle attachment allows the dough to develop fully while incorporating every ingredient evenly. Initially, the mixture comes together into a firm mass before gradually becoming smoother and lighter in appearance. Continuing to beat the dough for several minutes helps create the whipped consistency needed for soft, fluffy dinner rolls. Although the dough may look different from traditional wheat dough, this texture is completely normal for gluten-free baking.
Why the Dough Needs Time to Rest
Allowing the dough to rest gives the flour time to fully absorb the liquid ingredients while giving the yeast an opportunity to begin fermentation. During this resting period, the dough becomes easier to shape and develops improved texture after baking. Whether resting at room temperature or in the refrigerator, covering the dough tightly helps prevent it from drying out. This stage requires patience, but it is one of the most important factors in creating soft and evenly textured gluten-free dinner rolls.
Shaping the Rolls for Even Baking
Once the dough has rested, it is divided into equal portions so that every roll bakes at the same rate. Keeping the portions uniform in size helps produce dinner rolls that look attractive and cook evenly from edge to center. Working with one piece at a time, gently knead the dough in clean, dry hands until the surface becomes smooth. Unlike traditional bread dough, there is no need to add extra flour while shaping, as this can alter the texture. A light dusting of tapioca starch on the work surface is all that is needed to prevent sticking while maintaining the dough’s softness.
Creating Perfectly Round Dinner Rolls
After kneading, each portion of dough is gently shaped into a smooth ball. Taking a little extra time during this step creates rolls with a professional appearance after baking. Smooth, evenly rounded dough allows the rolls to rise uniformly and develop an attractive golden crust. Whether you arrange the rolls close together for soft pull-apart bread or slightly apart for individually baked rolls, consistent shaping helps achieve beautiful bakery-style results every time.
Choosing How to Arrange the Rolls
One of the enjoyable features of this recipe is deciding how you want the finished rolls to look. Placing the dough balls close together allows them to rise into one another, creating classic pull-apart dinner rolls with exceptionally soft sides. Spacing them farther apart gives each roll its own golden crust all around, making them easier to serve individually. Both methods produce delicious results, so the choice depends entirely on your personal preference and the occasion.
The Importance of the Second Rise
After shaping, the rolls need one final rise before baking. During this stage, the yeast continues producing air that expands the dough, giving the rolls their light and fluffy texture. The length of this rise varies depending on the temperature of your kitchen, so patience is more important than watching the clock. Properly risen rolls become noticeably larger and lighter while maintaining a smooth surface. This final proof helps create the tender interior that makes homemade dinner rolls so satisfying.
Recognizing When the Dough Is Ready
Rather than relying only on timing, it is helpful to observe the appearance of the dough. The rolls should increase to approximately one and a half times their original size while maintaining a smooth surface. If the dough begins developing a pockmarked appearance, it is usually a sign that it has risen enough and should be baked soon. Paying attention to these visual cues helps achieve consistent results regardless of seasonal temperature changes in the kitchen.
Baking at the Right Temperature
Proper oven temperature plays a major role in producing evenly baked Gluten Free Dinner Rolls. A fully preheated oven allows the rolls to rise rapidly during the first few minutes of baking while developing a beautifully golden crust. Baking at the recommended temperature ensures that the interior cooks thoroughly without drying out the exterior. Since every oven performs slightly differently, checking the internal temperature of the rolls is the most reliable way to determine when they are perfectly baked.
Why Internal Temperature Matters
Using an instant-read thermometer removes the guesswork from bread baking. When the center of each dinner roll reaches approximately 190°F, the bread is fully baked while still remaining soft and moist inside. This method helps prevent undercooked centers as well as overbaking, which can make gluten-free bread dry. Although the crust should appear golden brown, checking the internal temperature provides the most accurate indication of doneness.
Brushing with Butter After Baking
As soon as the rolls come out of the oven, brushing them generously with melted butter adds both flavor and visual appeal. The warm rolls quickly absorb the butter, producing a glossy finish and an even softer crust. This final step enhances the rich homemade taste while giving the rolls the classic buttery aroma that makes fresh bread so irresistible. Served warm straight from the pan, these butter-brushed Gluten Free Dinner Rolls are soft, fluffy, and ready to complement almost any meal.
Delicious Ways to Serve Gluten Free Dinner Rolls
These soft Gluten Free Dinner Rolls pair wonderfully with a wide variety of meals and occasions. Serve them warm with butter alongside soups, stews, roasted meats, grilled chicken, pasta dishes, or fresh salads for a complete and comforting meal. They are equally delicious sliced for mini sandwiches, filled with turkey, ham, cheese, or vegetables. During holiday celebrations, these fluffy rolls become a favorite addition to Thanksgiving, Christmas, Easter, and family dinners because they complement almost every main course. Their light texture and buttery flavor make them enjoyable on their own or with sweet spreads such as fruit preserves or honey.
Ideal for Family Meals and Special Occasions
Freshly baked dinner rolls have a way of bringing people together, and these gluten-free rolls are no exception. Their soft texture and homemade flavor make them suitable for everyday dinners as well as elegant celebrations. Whether you are preparing a casual weekend meal or hosting a festive gathering, these rolls fit beautifully on the table. Because they are gluten-free, everyone can enjoy the same bread without feeling left out. Their attractive golden appearance also makes them a beautiful addition to any bread basket or holiday buffet.
Perfect for Meal Preparation
These Gluten Free Dinner Rolls are an excellent option for meal prep because they stay soft when stored properly. Baking a full batch in advance allows you to enjoy homemade bread throughout the week without repeating the entire baking process. They can be reheated quickly before serving, restoring much of their freshly baked texture. Having homemade gluten-free rolls readily available also makes preparing quick lunches and family dinners much easier while reducing the need for store-bought bread.
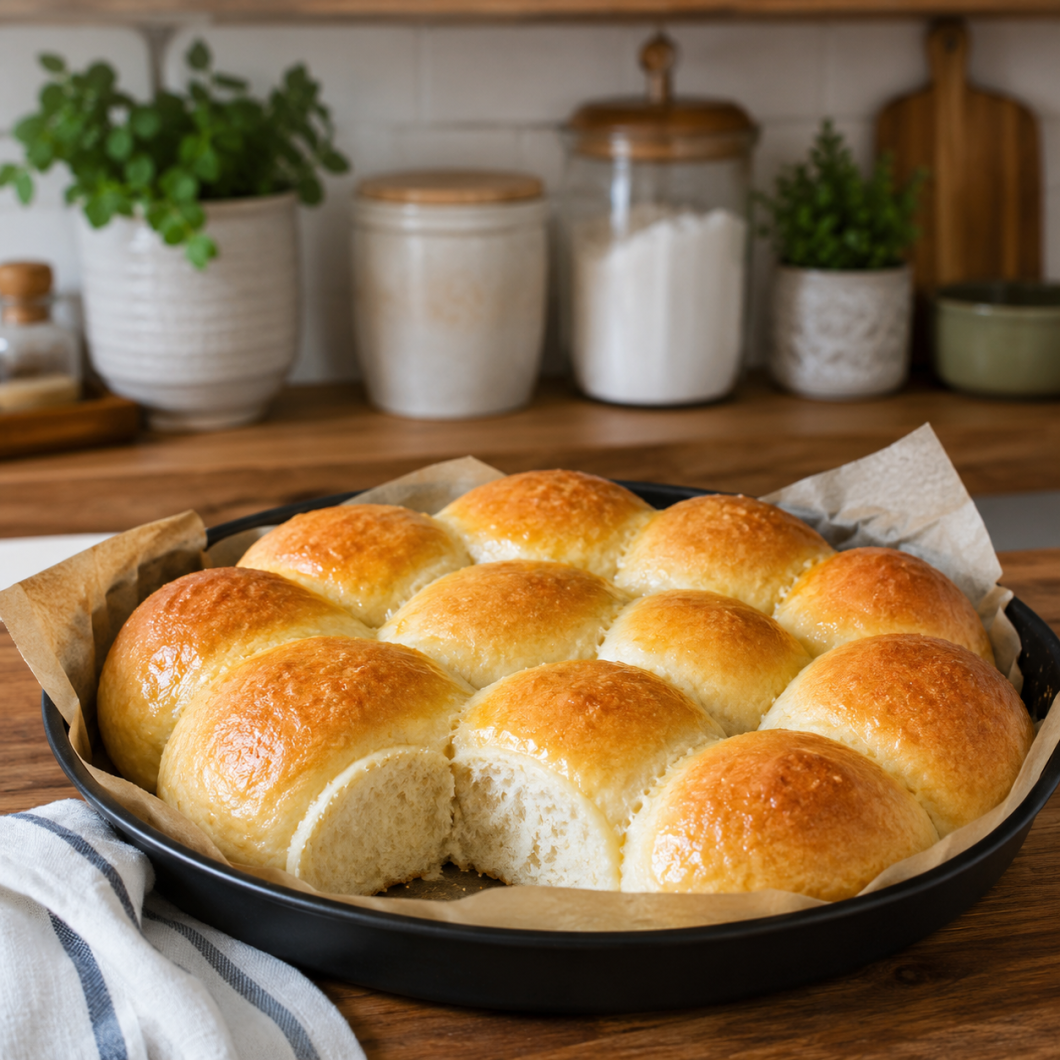
Gluten Free Dinner Rolls
These Gluten Free Dinner Rolls are incredibly soft, fluffy, and buttery with a light, tender crumb that closely resembles traditional homemade dinner rolls. Made with a gluten-free flour blend, tapioca starch, yeast, and simple pantry ingredients,
16
servings30
minutes3
hours113
kcal20
minutes3
hours50
minutesIngredients
- Dry Ingredients
3¼ cups (455 g) all-purpose gluten-free flour blend (Better Batter)
3¼ teaspoons xanthan gum (omit if your flour blend already includes it)
⅞ cup (105 g) tapioca starch (plus extra for lightly dusting the work surface)
4 teaspoons (12 g) instant yeast
¼ cup (50 g) granulated sugar
1 teaspoon kosher salt
- Wet Ingredients
1⅝ cups (13 fluid ounces) warm milk (about 90°F)
8 tablespoons (112 g) unsalted butter, melted and cooled (plus extra melted butter for brushing)
2 egg whites (approximately 50 g, at room temperature)
Directions
- Prepare the Dry Ingredients
Place the gluten-free flour blend, xanthan gum, tapioca starch, instant yeast, and granulated sugar into the bowl of a stand mixer. Whisk until evenly combined, then add the kosher salt and mix once more. - Add the Wet Ingredients
Pour the warm milk, melted butter, and room-temperature egg whites into the dry ingredients. - Mix the Dough
Using the paddle attachment, beat the dough thoroughly. Continue mixing for about 6 minutes until the dough forms a smooth, whipped consistency that pulls away from the sides of the bowl before sticking lightly again. - First Rise
Transfer the dough into a lightly greased bowl or container with a tightly fitting lid. Leave it to rest at room temperature for at least 2 hours, or refrigerate it for up to 24 hours if preparing ahead. - Bring Refrigerated Dough to Room Temperature
If the dough has been refrigerated, leave it covered on the kitchen counter until it reaches room temperature before shaping. - Prepare the Baking Pans
Lightly grease a quarter sheet pan or several round cake pans, depending on whether you prefer pull-apart rolls or individually baked rolls. - Divide the Dough
Divide the dough into 16 equal portions, approximately 2½ ounces each. - Shape the Rolls
Working with one portion at a time, gently knead the dough using clean, dry hands until smooth. Lightly dust the work surface with tapioca starch if necessary, then shape each portion into a smooth round ball. - Arrange the Rolls
Place the shaped dough balls into the prepared baking pan. Position them close together for pull-apart rolls or slightly apart if you prefer individually baked rolls. - Second Rise
Cover the pan loosely with lightly greased plastic wrap and place it in a warm, draft-free location. Allow the rolls to rise until they reach approximately 150% of their original size. - Preheat the Oven
As the rolls finish rising, preheat the oven to 375°F (190°C). - Brush with Butter
Remove the plastic wrap and generously brush every exposed surface of the rolls with melted butter. - Bake
Bake the rolls until an instant-read thermometer inserted into the center reaches approximately 190°F (88°C).
If the rolls are not touching, bake for approximately 20 minutes.
If the rolls are touching, reduce the oven temperature to 350°F after about 18 minutes and continue baking for approximately 5 additional minutes, or until fully cooked. - Finish and Serve
Remove the rolls from the oven and immediately brush them once again with melted butter while they are still hot. Serve warm for the best flavor and texture.
Nutrition Facts
16 servings per container
- Amount Per ServingCalories113
- % Daily Value *
- Total Fat
7g
9%
- Trans Fat g
- Total Carbohydrate
34g
13%
- Protein 3g 6%
* The % Daily Value tells you how much a nutrient in a serving of food contributes to a daily diet. 2,000 calories a day is used for general nutrition advice.