admin1
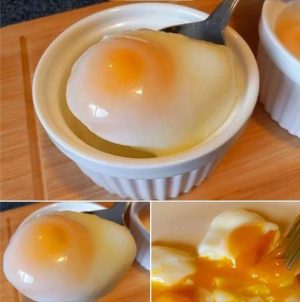
Mastering the Art of Poached Eggs – A Step-by-Step Guide for Perfect Breakfasts
Poached eggs are a true breakfast classic, known for their creamy, delicate texture and rich flavor. When done right, poaching eggs can transform a simple meal into a gourmet delight. Whether you’re adding poached eggs to a warm bowl of oatmeal, enjoying them atop avocado toast, or pairing them with crisp greens, they’re an incredibly versatile and healthy option. This guide will walk you through every step of the process to ensure your poached eggs come out perfect every time.
What Makes Poached Eggs So Special?
Poached eggs stand out from other egg preparations due to their soft, runny yolks and tender whites. The method of poaching involves cooking the egg gently in simmering water, as opposed to boiling, which helps to preserve the delicate texture. Unlike scrambled or fried eggs, poaching creates a luscious consistency, making them ideal for a healthy, lighter breakfast.
When done correctly, poached eggs are not only a culinary delight but also a nutrient-packed food. With just a few ingredients, poached eggs provide a good dose of protein, essential vitamins, and minerals, including vitamin A, calcium, and iron. The minimal preparation process also makes them an easy, fuss-free option for busy mornings.
Choosing the Best Ingredients for Poached Eggs
To make the perfect poached eggs, all you need is one or two simple ingredients. The star of the show is, of course, the egg itself. Fresh eggs are essential for poaching. The fresher the egg, the more intact the whites will remain during cooking, resulting in a neater, more attractive egg. Older eggs tend to spread out more in the water, leading to a less uniform shape.
You’ll also need some water for poaching. It’s important to maintain the right temperature—water should be at a gentle simmer, not a rapid boil. To help the eggs maintain their shape during cooking, a small amount of vinegar can be added to the water. The vinegar helps the egg whites set quickly, keeping the egg from becoming too spread out. However, vinegar is optional; if you prefer to skip it, you can still achieve great results by paying careful attention to the water temperature and cooking time.
The Essential Tools for Poaching Eggs
While poaching eggs is straightforward, using the right tools can make the process much easier. Here’s a quick rundown of what you’ll need:
- A Pot or Deep Pan – A large pot or pan is necessary for poaching eggs. It should have enough room to allow the egg to float freely in the water.
- A Fine Mesh Strainer or Sieve – A fine mesh sieve will help separate any excess egg white from the yolk, ensuring that only the firm whites are poached. This step also prevents the egg whites from spreading too much in the water.
- Slotted Spoon – A slotted spoon is crucial for removing the poached egg from the water gently. It allows excess water to drain away, leaving you with a perfectly poached egg.
- Ramekins – Small bowls or ramekins are useful for holding the cracked egg before it enters the water. This prevents the egg from breaking or spilling when added to the pot.
Step-by-Step Instructions for Poaching Eggs
Step 1: Preparing the Water
The first step is to prepare the water for poaching. Begin by filling a large pot with water—enough to fully submerge the egg. Bring the water to a boil over high heat, then reduce the heat to low. You want the water to simmer gently, not boil rapidly. If the water is too hot, it can cause the egg whites to break apart, leading to a mess in your pot.
For those who prefer to use vinegar, now’s the time to add it to the water. About 1 to 2 tablespoons of vinegar should suffice. The vinegar helps the egg whites coagulate quickly, so they stay together instead of dispersing in the water.
Step 2: Preparing the Egg
While the water is heating up, it’s time to prepare the egg. Crack a fresh large egg into a fine mesh strainer or sieve set over a small bowl. Gently swirl the egg in the sieve to remove any excess liquid egg whites. This step helps ensure that the egg white remains compact and doesn’t spread too much during cooking. Once the excess egg whites have drained away, carefully transfer the egg to a small ramekin.
Step 3: Creating a Vortex
This next step helps ensure that the egg holds its shape while cooking. Use a spoon to stir the simmering water in a circular motion, creating a vortex. The vortex will gently pull the egg white around the yolk, helping the egg stay compact and maintaining a neat shape.
Step 4: Poaching the Egg
Once the vortex is created, carefully slide the egg from the ramekin into the center of the swirling water. The egg should be added gently to prevent the yolk from breaking. Let the egg cook for about 3 minutes. During this time, the egg white will firm up, while the yolk will remain soft and runny.
It’s important not to disturb the egg too much during cooking. Simply let it float in the simmering water, and keep an eye on the clock to ensure it doesn’t cook too long.
Step 5: Removing the Egg
After 3 minutes, the poached egg should be ready. Using a slotted spoon, carefully lift the egg out of the water. Gently dab it on a paper towel to remove any excess water. This helps prevent the egg from becoming soggy when served.
The poached egg is now ready to be served on your favorite breakfast dish. Whether you prefer it on toast, atop a salad, or with avocado, the possibilities are endless!
Step 6: Storing Poached Eggs for Later Use
If you’re meal prepping or simply want to make poached eggs ahead of time, they can be stored for later use. After poaching the eggs, transfer them to an ice water bath to stop the cooking process. Store the eggs in a sealed container in the fridge for up to 4-5 days. When you’re ready to serve them, simply submerge the cold poached egg in a bowl of hot water for 20-30 seconds to reheat. Once warmed through, remove the egg, dab it dry, and serve.
Tips for Perfect Poached Eggs Every Time
- Fresh Eggs Are Key: The fresher the egg, the better the poached result. Fresh eggs will hold their shape better and give you that beautiful, round poached egg appearance.
- Control the Heat: Keep the water at a low simmer, not a boil. High heat can cause the egg whites to break apart or become too tough.
- Vinegar is Optional: If you don’t like the taste of vinegar or prefer not to use it, you can still poach eggs perfectly without it.
- Use a Timer: Poach your eggs for exactly 3 minutes for that perfect runny yolk. If you prefer your yolk a little more set, add an extra minute or two to the cooking time.
Conclusion
Poached eggs are a simple yet elegant breakfast option that can elevate any dish. With a little practice, you can master the art of poaching eggs, and soon you’ll be able to enjoy them any time you want. Whether you’re making them fresh or storing them for later use, poached eggs are a nutritious, versatile, and delicious choice. By following the steps outlined in this guide, you can make perfectly poached eggs every time, adding a touch of luxury to your everyday meals.
Simple Poached Egg Recipe
Ingredients:
- 1 large egg
- 1-2 tbsp vinegar (optional)
Instructions:
- Heat the Water: Bring a large pot of water to a boil, then reduce to low heat to maintain a gentle simmer.
- Prepare the Egg: Crack the egg into a fine mesh sieve to remove excess egg whites. Transfer to a ramekin.
- Make a Vortex: Stir the simmering water to create a vortex and add the egg gently to the center of the swirl.
- Cook: Let the egg cook for 3 minutes, until the whites are set but the yolk remains soft.
- Remove and Serve: Use a slotted spoon to lift the egg out of the water. Dab dry on a paper towel and serve immediately.
Enjoy your perfectly poached egg on toast, a salad, or however you prefer!